ads1

Saturday, September 8, 2012

Gokul Vegetarian Restaurant, Singapore | Restaurant Review

When Anu visited us for 2 days, she wanted to have good vegetarian Malay food in Singapore. I hadn't really looked around for asian vegetarian food in Singapore, we mostly just get Indian when we eat out or maybe Mexican or Italian. A quick search brought up Gokul Vegetarian Restaurant in Upper Dickson Road, near Little India, and boy, it was a treat!


Gokul Asian Vegetarian Restaurant Singapore  | Gokul Vegetarian Restaurant Singapore

Their menu is extensive, and when I say extensive, I mean extensive! They have Asian (Thai, Malay, Indonesian, Singaporean) vegetarian food and also North Indian and South Indian food, including starters. Everything is 100% vegetarian and the dishes don't even contain egg, onions or garlic.

A quick look at what we ordered and the reviews for each.

Gobi 65 | Gokul Vegetarian Restaurant Singapore

Gobi 65 to start the meal. It was crisp and perfectly cooked inside. We especially loved the mint chutney it came with. They also served fried papad for the table.
Vegetarian Malaysian Laksa | Gokul Vegetarian Restaurant Singapore

Vegetarian Laksa. Anu specifically wanted vegetarian Laksa and Gokul did a decent job of it too. The portion size was quite but and the broth was quite authentic in terms of texture and colour. However, for someone who has had the real thing, this was no match. I could taste too much coconut in the gravy (btw, there's nothing called too much coconut, ever, but in a Laksha, there sadly is) and without the fish, a Laksa is not a Laksa. Anu and family were quite happy with it too. The fried tofu was sodden and cooked perfectly too.
Chilli Chicken | Gokul Vegetarian Restaurant Singapore

The chilli chicken that TH and I ordered. They use mock meat made with soy protein for this and it was really good. I could manage with this if I just can't eat the real thing anymore. It came on a sizzler plate which was an added bonus.
Manchurian Fried Rice | Gokul Vegetarian Restaurant Singapore

Manchurian Fried Rice. Was flavourful, spiced just right, and was a generous portion than four adults could share.
Sambal Fried Rice | Gokul Vegetarian Restaurant Singapore

Malaysian Sambal is made with dried anchovies and I was a bit skeptical when they offered the vegetarian version of this. This sambal fried rice was a pleasant surprise! It was delicious and had a pretty distinct flavour from the Manchurian Fried Rice above although they look the same.
Vegetarian Char Kway Teow | Gokul Vegetarian Restaurant Singapore

Vegetarian Char Kway Teow with mock meat. Char Kway Teow is a dish very close to my heart so I was eager to taste the vegetarian version. It was good. Not Penang-street-food good but still very good for a vegetarian version which had to take its flavour from mock meat.
Vegetarian Kheema Masala Dosa | Gokul Vegetarian Restaurant Singapore

The delicious vegetarian kheema masala dosa that Amrith and I shared. It was spicy, made with soya chunks and peas, and some masala, and was very filling. Came with sambar and three kinds of chutney in generous quantities. A great order and one I would repeat if I went back although the menu is so vast and has so many other enticing things for us to try.
Ice Lychee Delight | Gokul Vegetarian Restaurant Singapore

TH and I also shared a drink called Ice Lychee Delight. We both love Lychee so this was pleasant and cooling, especially paired with the spiciness of the kheema dosa. Anu's daughter got a veggie burger that came with fries and also an ice cream sundae.

For a very filling meal for 4 adults and one child, the cost was very reasonable at SGD 75.

Their website has the detailed menu with pictures to show what it is. Portions are generous so be cautious of over-ordering. They also have South Indian and North Indian food but since Asian / Malay / Indonesian vegetarian food is rare in Singapore, I would definitely recommend that.

Overall, highly recommended for a different vegetarian dining experience in Singapore. Check out more restaurant reviews on Edible Garden. 

Gokul (Asian) Vegetarian Restaurant
19 Upper Dickson
Road Singapore 207478
Tel: 6396 7769

Alternate Location:
190 Fortune Centre
#01-07 Singapore 188979
Tel: 6337 4811
Wednesday, September 5, 2012

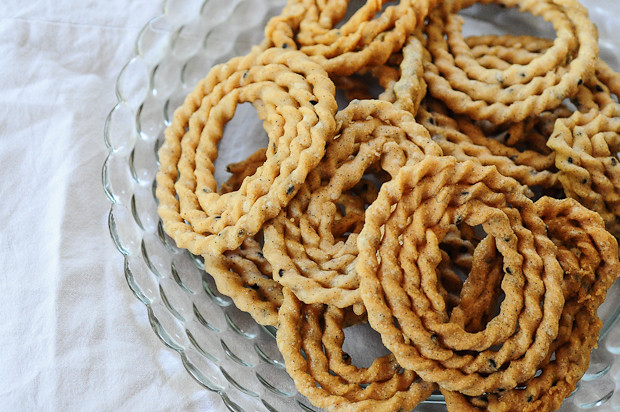
Kai Murukku | Raw Rice Murukku | Step by Step Diwali Snacks Recipes

Ah. Kai Murukku or Sakkiram, as we Kerala Reddiars call it, is one of those things that holds so many memories for me. This is one of those foods I associate with my maternal grand mom. Back when I was a kid, making Sakkiram was always an event. The rice would be carefully selected (my dad was a rice dealer after all), the process of soaking and drying and powdering carefully handled, the oil bought, the single-burner gas stove brought out and set on the kitchen floor, the largest steel plates brought out, washed, dried and oiled to be used as the base for the murukku, and the kitchen cleared out one day early afternoon for the murukku making to commence.

Kai Murukku | Raw Rice Murukku | Snacks Recipes

As I type this, I can visualise those humid Kerala evenings when the house would fill with the aroma of coconut oil and the sizzle of the sakkirams will reach us kids where we are playing or whiling away time doing pretty much nothing useful.

Kai Murukku | Raw Rice Murukku | Snacks Recipes
Everything my grandmom used to do, especially cooking, was a labour of love. She never took shortcuts, never skimped on effort, was patient and painstakingly meticulous in everything she did (although patience was not a virtue of hers in general) and kai murukku / sakkiran was no exception.

Since we always made them in bulk, there would atleast be 4 people involved in the preparation process, one person exclusively doing the deep frying - usually the maid. My mom, her elder sister, and their mother would sit on the kitchen floor, saris hoisted to a comfortable height, pallus tucked in and start on one batch of the murukku dough. Each of them gave a unique twist, quite literally, to the murukku and the kids would attempt to guess who made which ones once everything was fried.

Sometimes I try not to think that those summer days are long gone never to return. We are supposed to move ahead, after all.

Kai Murukku | Raw Rice Murukku | Sakkiram Recipe


Preparation time: 1 hour
Cooking time: 45 minutes
Makes ~20 pieces
Recipe source: Amma and Aatha

Ingredients:
1 cup of raw rice, soaked in water for 1 hour
1/3 cup of split urad dal / ulutham paruppu
1 tbsp of black sesame seeds
1 tbsp of white sesame seeds (see notes)
1 tsp of crushed jeera / cumin seeds (optional)
2 tsp of softened butter
Salt of to taste
Oil of to deep fry (we use coconut oil)

How to Make Kai Murukku

1. Lay the soaked raw rice on a white cheesecloth or muslin until the water has completely drained. You can also use a colander, just make sure to spread it in a thin layer so that maximum water can drain out. Powder this fine and set aside. If you feel it's moist after powdering, lay it on the cloth (or even a large plate) again so that it gets drier.

2. Dry roast the urad dal until it turns aromatic and a light golden brown. Powder this finely.

3. Sieve both the rice powder and the urad dal (separately) into a large bowl. The coarse rice bits that you get can be ground again and passed through the sieve to minimise wastage.

4. Mix both the powders with the sesame seeds, jeera (if using), butter and salt.
Kai Murukku | Raw Rice Murukku | Snacks Recipes

5. Once the ingredients are thoroughly combined, add water very little at a time and knead into a soft dough. The consistency is important and it only gets perfect with practise but there are some tips to make it work even if you are a novice (see notes).
Kai Murukku | Raw Rice Murukku | Snacks Recipes

6. Here's the part that needs a bit of practise to get perfect. Take a lemon-sized dough in hand and gently pinch with three fingers into a long-ish shape. Twist gently and form a circular pattern of about 4-5 turns. This video, although in tamil, demos this process very well. My mom and her sister are experts and get the shape beautifully because they've been doing this for years so don't be put off if yours doesn't come out well the first time. Keep your fingers moist and lightly greased to make the process easier.

We use the greased, upturned steel plate for this. A plastic sheet works well too.
Kai Murukku | Raw Rice Murukku | Snacks Recipes

Repeat process until you have about 8-10 murukku ready to be fried..
Kai Murukku | Raw Rice Murukku | Snacks Recipes

7. Heat oil until almost-smoking point and slide a thin spatula under each murukku swiftly to transfer it to the spatula without losing its shape. Gently slide into the hot oil and fry until brown. It helps greatly if the spatula is lightly greased with oil too.The rule of thumb is, stop and drain the murukku when the oil no longer sizzles around it.
Kai Murukku | Raw Rice Murukku | Snacks Recipes

Kai Murukku | Raw Rice Murukku | Snacks Recipes

We prefer ours not too red but you can judge by the colour how much you want to fry. Store in an airtight container for up to 3 weeks. I keep it in the refrigerator for longer.
Kai Murukku | Raw Rice Murukku | Snacks Recipes

Notes:

- you can use just one kind of sesame seeds if you don't have both varieties. The black ones have a better flavour when fried so go for that if you only want to use one.

- butter makes the murukku softer but adding too much will make the dough too soft and the murukku will drink too much oil. Err on the lower side than adding a higher quantity of butter than needed

- if the dough is too wet and sticky, wrap in a clean kitchen towel/cheesecloth/muslin and let it sit for 10 mins. The cloth will absorb the extra moisture and you can proceed with the rest of the murukku recipe. If it's too dry, wet hands and pinch off a bit of dough to work with. Having a drier dough is a better problem to have because it's easier to fix

- using readymade raw rice powder won't work well for kai murukku because what we get to buy is roasted raw rice (done to improve shelf life) which would've lost much of its starchiness required to make kai murukku. If you can get your hands on unroasted raw rice powder somehow, then that's worth a shot.

- If you are working alone, it's better to knead a little dough at a time, otherwise it will start to ferment, turn sour, and make the murukku too red in colour when frying. It also compromises the taste

- you can use the same dough and make achu murukku - with the murukku press - which is much quicker and easier

- admittedly, I haven't tried making kai murukku myself. All pics are sent to me by amma and mama (her brother). If you have questions, leave it in the comments section and I will get back. Let's learn together :)

Thursday, August 30, 2012

Green Peas Poricha Kuzhambu Recipe, Make Poricha Kuzhambu

I wasn't really familar with poricha kozhambu varieties until my mom in law made it during their last visit. I had some fresh peas in the fridge and along with some drumstick, it made for a super simple and flavourful kozhambu for our lunch that day.

Peas Poricha Kozhambu

Poricha kozhambu literally means roasted kozhambu because the base has some roasted spices that are ground along with fresh coconut. The vegetables are flexible and the more common ones are chow chow, pumpkin, and snake gourd (podalangai). Check out pudalangai poricha kuzhambu recipe here.

Green Peas Poricha Kozhambu Recipe

Preparation time: 15 minutes
Cooking time: 25 minutes
Serves 4-6
Recipe Source: mom-in-law

Ingredients:
1 cup of green peas (fresh or frozen)
1/2 cup of toor dal / tuvar dal / pigeon peas
1/2 cup of grated coconut
3 tsp of urad dal
A few of black peppercorns
1/2 tsp of jeera / cumin seeds
4 of dry red chillies
1/4 tsp of turmeric powder
1 generous pinch of hing / asafoetida / perungaayam
1 tbsp + 1 tsp of oil
1/4 tsp of mustard seeds
A few of curry leaves
1 of drum stick, cut into 4" long pieces

INSTRUCTIONS:
Peas Poricha Kozhambu

0. Pressure cook the toor dal until soft and mushy.

1. Add the peas and drumsticks to a pan and add enough water to cover it. Bring to boil and cook until sof (about 5-6 mins).

2. Add the cooked dal along with the turmeric and hing to the peas and drumsticks mixture and simmer for a few more mins.

3. Meanwhile, heat 1 tsp oil in a small pan and roast the urad dal, red chillies, peppercorn, and jeera until the dal turns golden brown. Cool slightly and grind along with the coconut into a smooth mixture.

4. Add the ground masala to the peas-dal-drumsticks mixture and bring to boil. Add salt and curry leaves. Continue to simmer until the desired consistency is reached. If too thick, add some water while boiling. If too watery, increase heat and cook until the kozhambu thickens.

5. Heat the 1 tbsp oil and add the mustard seeds. When they begin to pop, remove from fire and dunk into the kozhambu.

Serve hot with rice and side dish of choice.

Peas Poricha Kozhambu

Check here for more kozhambu recipes

Sunday, August 26, 2012

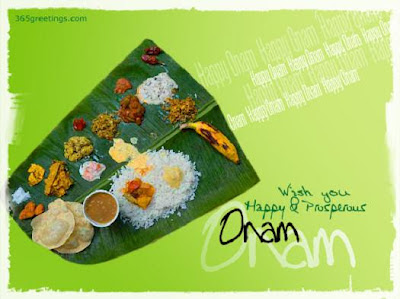
Recipes for Onam Sadya | Onam Recipes

I did a similar list of Recipes for Onam Sadya 2010 but since I have a lot more Kerala sadya recipes in the site since then, thought of doing an updated list. Since Onam 2012 falls on a Wednesday, me cooking the entire sadya is slightly out of the question. Ok wait, I haven't yet cooked a complete sadya myself so far, weekend or weekday, so.. err.. let's not go there.

I know some of you are planning to cook up a feast, literally, and judging by the few emails I got asking for easy Onam recipes, I think this list will be useful to many of you.


Moru Kachiyathu / Spiced Buttermilk (omit coriander leaves)


Ella Edible Garden Readers-num ente hridayam niranja Onaashamsakal!


image courtesy 365greetings.com