"How do I bake a cake in a pressure cooker?" This is the most often asked question in comments, emails, and messages on this blog. I postponed baking in a pressure cooker because, frankly, I was scared to try it. I vaguely remember my aunt cautioning me against it when I was a child and I have read on quite a few blogs that, yes, you can definitely bake a cake in the pressure cooker but it's not very good for your cooker and it may compromise its safety.
Technically, I didn't see what the issue was but I did have this (probably) irrational fear of making a cake in a pressure cooker, especially since I had a perfectly functioning and good oven. But I ventured forth last weekend and made a cake from scratch in a pressure cooker, and let me tell you, there's really nothing to fear, just a few things to remember. So here goes.
HOW TO BAKE CAKE IN A PRESSURE COOKER
1. Decide on a good, uncomplicated recipe for your pressure cooker cake. I will share the recipe of the cake in the picture above very soon but I would guess that pretty much all cake recipes will work well in a pressure cooker too. Prepare the batter and set aside.
2. Use a pressure cooker that's at least 3 litres, but 5 litres is a good size and what I would recommend.
3. Remove the gasket (the rubber insulation thing) on the lid of your pressure cooker. This is an important step. You also do NOT need the whistle.

4. My pressure cooker came with this stand that goes at the bottom of the cooker pan. It distributes heat more evenly and is especially useful when baking in the pressure cooker. If you don't have, try to find a substitute. Maybe a small, thick steel plate would do the job as well.

It's better not to have the cake pan touch the bottom of the pressure cooker directly since that may cause the bottom of the cake to cook more rapidly. Another option is to place the pressure cooker on a flat griddle or tawa and cook the cake. It's just an insulation between the flame and the bottom of the cooker to protect the cake.

5. Another important thing to remember is, do NOT add any water to the pressure cooker pan for baking a cake. If you do, you will be steaming the cake (which is fine to do - here's my method of steaming a cake) but here we are trying to create an oven-like environment using a pressure cooker, as much as possible. The heat generated in the pressure cooker wil be enough to cook/bake the cake.
6. Before starting to bake the cake, you need to pre-heat the pressure cooker. For this, just place the lid (without gasket) on the pressure cooker (which should contain no water) and cook on high heat for 2 mins.

7. Now you can put the cake batter in. Make sure to use a cake pan that fits comfortably in the pressure cooker without the sides touching. Use a pot-holder since the cooker will be hot because of the pre-heating.

After placing the batter in, close the lid and cook on medium heat for 5 minutes and then lower the flame to just a simmer. The cake, depending on the size of your cake pan and pressure cooker, will take anywhere between 45 minutes to 1 hour to bake.

IMPORTANT NOTES:
All that aside, I baked an eggless vanilla cake with tutti frutti in pressure cooker and it turned out moist and delicious.Recipe coming soon! Recipe linked above.
To learn How to Make Pressure Cooker Cake in Hindi, Marathi, Urdu, Tamil, Telugu, etc, please use the Google translate button in the right sidebar. Thanks!
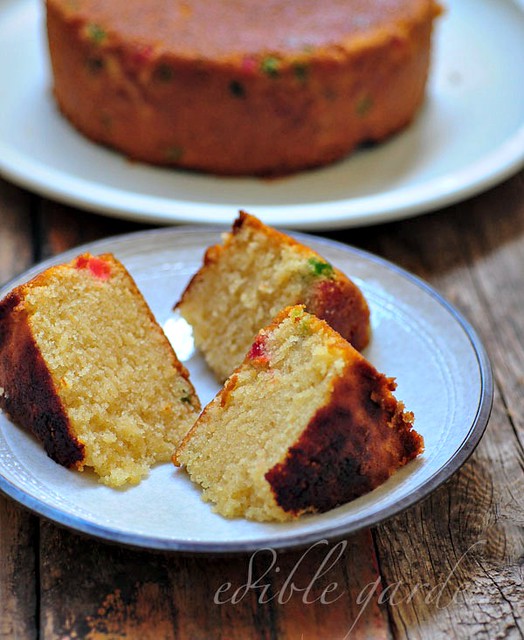 |
| Eggless Vanilla Cake with Tutti Frutti - made in a Pressure Cooker |
Technically, I didn't see what the issue was but I did have this (probably) irrational fear of making a cake in a pressure cooker, especially since I had a perfectly functioning and good oven. But I ventured forth last weekend and made a cake from scratch in a pressure cooker, and let me tell you, there's really nothing to fear, just a few things to remember. So here goes.
HOW TO BAKE CAKE IN A PRESSURE COOKER
1. Decide on a good, uncomplicated recipe for your pressure cooker cake. I will share the recipe of the cake in the picture above very soon but I would guess that pretty much all cake recipes will work well in a pressure cooker too. Prepare the batter and set aside.
2. Use a pressure cooker that's at least 3 litres, but 5 litres is a good size and what I would recommend.
3. Remove the gasket (the rubber insulation thing) on the lid of your pressure cooker. This is an important step. You also do NOT need the whistle.
4. My pressure cooker came with this stand that goes at the bottom of the cooker pan. It distributes heat more evenly and is especially useful when baking in the pressure cooker. If you don't have, try to find a substitute. Maybe a small, thick steel plate would do the job as well.
It's better not to have the cake pan touch the bottom of the pressure cooker directly since that may cause the bottom of the cake to cook more rapidly. Another option is to place the pressure cooker on a flat griddle or tawa and cook the cake. It's just an insulation between the flame and the bottom of the cooker to protect the cake.
5. Another important thing to remember is, do NOT add any water to the pressure cooker pan for baking a cake. If you do, you will be steaming the cake (which is fine to do - here's my method of steaming a cake) but here we are trying to create an oven-like environment using a pressure cooker, as much as possible. The heat generated in the pressure cooker wil be enough to cook/bake the cake.
6. Before starting to bake the cake, you need to pre-heat the pressure cooker. For this, just place the lid (without gasket) on the pressure cooker (which should contain no water) and cook on high heat for 2 mins.
7. Now you can put the cake batter in. Make sure to use a cake pan that fits comfortably in the pressure cooker without the sides touching. Use a pot-holder since the cooker will be hot because of the pre-heating.
After placing the batter in, close the lid and cook on medium heat for 5 minutes and then lower the flame to just a simmer. The cake, depending on the size of your cake pan and pressure cooker, will take anywhere between 45 minutes to 1 hour to bake.
IMPORTANT NOTES:
- A pressure cooker is not meant for baking or using in the manner described above so consider that before using it to make a cake.
- I don't expect it will burst into pieces while cooking (I was very worried about this though, without reason) but it may compromise the quality of the safety valve on the lid and the high heat may cause the handle and other parts to deteriorate a bit.
- Using your pressure cooker to bake once or twice a year is probably okay but not regularly. If you bake anything more than once a month, I recommend buying an oven. It will be worth it and your options are much wider than using a pressure cooker to bake.
- Always check manufacturers instructions to make sure your make and model of pressure cooker can handle this. I am not sure how a steel pressure cooker will behave, mine is a basic 5 litre aluminium one. It's probably best not to do this in a non-stick pressure cooker since dry-heating a non-stick surface without water or oil is not advised.
All that aside, I baked an eggless vanilla cake with tutti frutti in pressure cooker and it turned out moist and delicious.
To learn How to Make Pressure Cooker Cake in Hindi, Marathi, Urdu, Tamil, Telugu, etc, please use the Google translate button in the right sidebar. Thanks!