ads1

Monday, May 27, 2013

Badam Kheer Recipe - Badam Milk Recipe - Indian Welcome Drink Ideas

Badam Kheer will always remind me of having guests over. Well, not really guests but people from your extended family who always arrived with laughter, love, and gifts. I am guessing some of the other stuff they brought along was not really visible to my 10-year old eyes but I loved it when my parents entertained, and they did a lot of it while I was growing up. Amma loved to cook for others and she always made a festival of it, planning and preparing a couple of days in advance and well into the actual day.
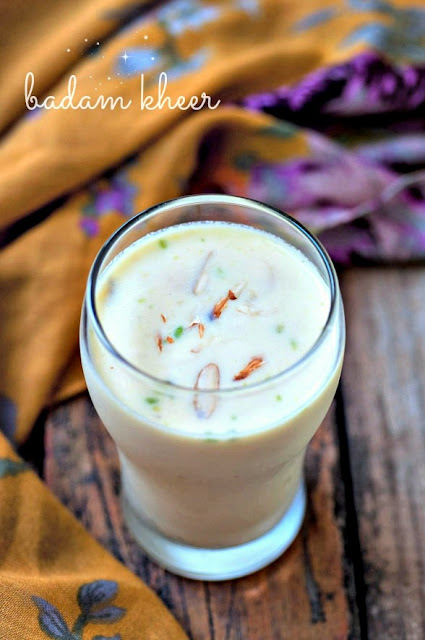
Badam Kheer - Badam Milk - A Welcome Drink Recipe Idea

Badam Kheer or Badam Milk was a standard welcome drink in her menu list when we had people over for lunch. The guests would start trickling in by 11am and it was my duty to pour glassfuls of chilled and fragrant badam kheer for those who have barely taken a seat in the hallway.

badam kheer-badam milk-welcome drink recipe

The reason why badam milk works as a great welcome drink is because it can be made the previous day and chilled overnight in the refrigerator, giving the flavours a chance to mingle and talk. It's also non-fussy and you can focus on the starts and appetizers while your eager 10-year old takes care of serving it. My mom really knows how to plan a party!

For more drink ideas, check out apple milkshake with almonds, banana mango milkshake, watermelon melon milkshake, and dates banana shake.

BADAM KHEER OR BADAM MILK RECIPE

Preparation time: 2 hours
Cooking time: 15 minutes
Makes ~6 glasses

Ingredients:
  • 12 almonds
  • 1 litre of milk (use full cream milk for best results)
  • 1 pinch of saffron (optional)
  • 1/2 tsp of Everest milk masala or 1/4 tsp powdered cardamom powder
  • 1/2 cup of sugar (adjust to taste)

How to Make Badam Kheer:

1. Soak the almonds in warm water for 1-2 hours. Remove skin by rubbing between your fingertips.
badam kheer-badam milk-welcome drink recipe

Also soak the saffron in 2 tbsp cold milk (if using).
badam kheer-badam milk-welcome drink recipe

2. Grind the almonds with 1/2 cup milk to a smooth paste.
badam kheer-badam milk-welcome drink recipe

The paste should be fine and smooth when you rub between your fingertips.
badam kheer-badam milk-welcome drink recipe

3. Cook this badam paste in a sauce pan on low heat until it starts to bubble. Let it simmer for 3-4 mins more. Then, add the remaining milk and let it come to boil. Continue to simmer.
badam kheer-badam milk-welcome drink recipe

4. When the raw smell leaves the kheer (about 8-10 mins), add the sugar. The amount of sugar really depends on personal taste but amma always made badam kheer a bit on the sweeter side.
badam kheer-badam milk-welcome drink recipe

5. Simmer for another 5 mins and then add the milk masala (or powdered cardamom) and soaked saffron. At this point, if you feel the badam milk is too thick, you can add more milk. Go with your preference.
badam kheer-badam milk-welcome drink recipe

6. Stir through once and as it begins to boil again, remove from fire.
badam kheer-badam milk-welcome drink recipe

Badam Kheer can be served warm or chilled but we prefer it chilled and that's the way it's always served in our home.

The milk masala has some pistachio bits which gives the badam milk a nice colour (it also has saffron but the flavour is not as deep as I'd like). You can add some slivered almonds or pistachios for texture if you don't have milk masala in hand.

Sunday, May 26, 2013

Breadfruit Thoran - Kadachakka Thoran - Kerala Thoran Recipes

Kadachakka thoran is my mom's most favourite dish. Or atleast that's what she always answered when I was 8 and annoying and constantly asked her questions like "amma, what's your most favourite food on earth". I love this spongy fruit too and when kadachakka (or breadfruit) is in season, we often have this thoran and kadachakka mezhukkupuratti back to back.

kadachakka thoran - breadfruit thoran recipe

Recently, my uncle visited me in Singapore and since breadfruit was in season, she sent me a small wedge. I chopped it up into small cubes and made thoran with it. We had it with chapati and some yellow dal tadka, an unusual combination for a thoran but much enjoyed nevertheless. The best thing about thorans is that it works with most vegetables and is super easy to put together for a quick lunch.

KADACHAKKA THORAN RECIPE

Preparation time: 10 minutes
Cooking time: 15 minutes
Serves 4 as a side

Ingredients:
  • 3 cups of breadfruit or kadachakka, peeled and cut into small cubes
  • 1/3 cup of grated coconut
  • 2-3 shallots / ulli
  • 1/2 tsp of cumin seeds / jeerakam
  • 2 green chillies
  • 1/4 tsp of turmeric powder
  • 2 tsp of coconut oil
  • 1/4 tsp of mustard seeds
  • A few curry leaves or a small bunch of coriander, chopped, for garnish

How to Make Breadfruit Thoran:

1. Heat oil in a pan and add the mustard seeds. When they pop, add the cut breadfruit pieces, turmeric, and some salt.
kadachakka thoran - breadfruit thoran recipe

2. Sprinkle some water and cook partially covered on low flame until the breadfruit becomes tender - about 8-10 mins.
kadachakka thoran - breadfruit thoran recipe

3. Meanwhile, coarsely grind the coconut + shallots + cumin + green chillies without adding water
kadachakka thoran - breadfruit thoran recipe

4. Add to the cooked breadfruit and mix well. Let it cook for another 2-3 mins.
kadachakka thoran - breadfruit thoran recipe

5. Sprinkle curry leaves or chopped coriander leaves on top. Mix again, and remove from heat.
kadachakka thoran - breadfruit thoran recipe

Kadachakka thoran will also taste fabulous with rice and Kerala Sambar if serving it with chapati and dal is not really doing it for you.

Saturday, May 25, 2013

Bialys - Chewy Bread Rolls with Onion Filling - Step by Step Recipe

Bialys (pronounced bee-ah-lee) was something unknown to me until Aparna chose it for our baking group this month. A little research shed some light on it, like how it's often compared to a bagel although they are made quite differently, and how it's relatively unknown outside New York when it's popular, although not as much as the bagels are. The texture is definitely comparable although I found the bialys to be much softer and less dense. The bialys has a chewy exterior and quite a soft interior, the onion filling complementing the bread-y part beautifully.

bialys-chewy bread rolls with onion filling

Bialys is quite easy to make at home, in fact it's not any different from making regular rolls at home. The shaping is a bit different though and since I didn't make a deep enough depression in the centre of the bilays, mine look more puffed up than they should.

bialys-chewy bread rolls with onion filling

In spite of that, they tasted delicious and we enjoyed hot off the oven with our evening tea. While they are best eaten warm and fresh. bialys keeps well for a day in an airtight container. Just make sure to warm up lightly before you eat them.

bialys-chew bread rolls with onion filling

BIALYS RECIPE

Preparation time: 5 hours
Cooking time: 15 minutes
Makes 12 medium-sized bialys
Adapted from: King Arthur Flour

Ingredients:
  • 3 cups of bread flour (check notes)
  • 1 1/4 cups of warm water
  • 1 tbsp of sugar
  • 1 tsp of instant or active dry yeast (I use and love Fleischmann Yeast)
  • 2 tbsp of milk, for brushing the rolls
  • 2 cups of finely sliced onions
  • 1 tbsp of oil
  • 1/2 tsp of roasted cumin powder
  • 1/2 tsp of salt
  • 1 tsp of garam masala

How to Make Bialys

Note: I used 1/3rd of all ingredients to get 4 rolls.

1. Add flour, sugar, salt, yeast to a large bowl and mix well. Slowly trickle in the warm water and knead together to form a sticky dough. I used my Kitchenaid for this but you can very well knead by hand too.
bialys-chew bread rolls with onion filling

2. Once the dough takes form, let it rest for 10 mins and continue kneading until you get a soft pliable dough that's not too sticky. If it is, sprinkle some flour and knead again but do this only if required. I didn't need to.
bialys-chew bread rolls with onion filling

3. Transfer dough to an oiled bowl and turn to coat it well.
bialys-chew bread rolls with onion filling

4. Cover with cling wrap and let it double in size - takes about 1-2 hours. You can also let the dough rise in the refrigerator overnight. Just make sure to set it out for 30 mins before proceeding with the next steps.
bialys-chew bread rolls with onion filling

5. Divide the dough into 12 equal parts.
bialys-chew bread rolls with onion filling

Form each into rolls by kneading with fingertips and making a smooth ball within your fist.
bialys-chew bread rolls with onion filling

6. Smooth into a ball and place on a baking tray lined with greased baking paper. Repeat with the rest of the rolls and loosely cover with cling wrap (use the same one as before) and let them rise for another or two.
bialys-chew bread rolls with onion filling

7. Meanwhile, make the filling by heating the oil, adding the cumin, and sauteeing the onions until golden brown. When onions are done, add salt and garam masala and mix well. Set aside to cool completely.
bialys-chew bread rolls with onion filling

8. Once the rolls have doubled, take each onto floured palms and make a dent in the centre by rotating it with both hands like a steering wheel.
bialys-chew bread rolls with onion filling

9. Place on the same baking sheet and poke holes in the centre with a fork so that it doesn't rise while baking. The depression in the centre needs to be well pronounced. Mine wasn't done enough so the entire roll rose a bit in my bialys making the shape less pronounced.
bialys-chew bread rolls with onion filling

10. Repeat with all the risen rolls and add the filling.
bialys-chew bread rolls with onion filling

11. Bake in a pre-heated oven at 230C / 450F for 15 mins. Don't let the rolls overbake, otherwise they turn hard. Once they start to brown on the sides, you can remove them.
bialys-chew bread rolls with onion filling

Notes:
  • You can replace bread flour with same amount of all-purpose flour or maida + 1 tsp vital wheat gluten. Some folks tried it with just the flour and it still turned out fine.
  • You can play around with the filling. I really wished I had some pizza cheese in hand, would have added some. You can also add some grated paneer when the rolls are almost done baking.
  • To check if the water for the dough is warm enough (or not too hot), place a finger in the water for 10 seconds and take out. Your finger should be able to bear the heat and feel warm once you have taken it out. This test always works for me.
  • Bialys is #5 in the list of 12 that the We Knead to Bake group is baking this year.

Thursday, May 23, 2013

Vegetable Spring Roll Dosa Recipe - Easy Dosa Recipes

I first had spring roll dosa when my in-laws used to live in Coimbatore and we went to Dosa Plaza, a restaurant that boasts over 100 dosa varieties on their menu. I chose spring roll dosa to justify my love for Indo Chinese recipes and as the name suggests, the dish came filled with vegetable spring roll filling wrapped in a dosa. It tasted nice and I had mentally bookmarked the idea to try spring roll dosa at home.

Spring Roll Dosa Recipe

If you have dosa batter and some vegetables handy, this doesn't take more than 20 mins to put together and spring roll dosa makes a great and novel after-school snack for kids. It's filling without being too heavy and all you need to serve it up is some ketchup or chutney.

Spring Roll Dosa Recipe
Spring Roll Dosa with Red Coconut Chutney
I cut up the spring roll dosa just like spring rolls and served with red coconut chutney but you can serve it as a single dosa on its own or with ketchup, which kids will surely love. Oh, who am I kidding? I love ketchup too!

Spring Roll Dosa Recipe

So whip up this quick and easy dosa and get ready for the wows and compliments!

Sidenote: In case you are looking for the fried vegetable spring roll recipe, I didn't want to disappoint you.

VEGETABLE SPRING ROLL DOSA RECIPE

Preparation time: 10 minutes
Cooking time: 15 minutes
Makes 4 dosas
Recipe idea: Dosa Plaza, Coimbatore

Ingredients:
4 cups of dosa batter (also known as 2 day old idli batter)
2 cups of mixed vegetables (carrots, beans, cabbage, spring onions, capsicum), julienned
1 tsp of minced garlic
1 tsp of pepper powder
1 tsp of chilli sauce
1/2 tsp of soya sauce
2 tsp of oil
1/2 cup of sliced onions

How to Make Spring Roll Dosa:

To Make the Filling:

1. Heat oil and saute the onions and garlic together until the onions turn soft.
Spring Roll Dosa Recipe

2. Add the mixed vegetables and saute until they turn soft and have cooked through - will take about 12 mins or so.
Spring Roll Dosa Recipe

3. Next, add the chilli sauce and soya sauce. Saute for a few more mins.
Spring Roll Dosa Recipe

That's it. The filling for our spring roll dosa is ready.
Spring Roll Dosa Recipe

To make the dosa:

1. Heat a pan and grease with oil. Add about 3/4 cup of dosa batter and spread into a thick-ish dosa. Don't make it too thin because that would make the dosa crisp and it'll break as you roll the dosa.
Spring Roll Dosa Recipe

2. Drizzle a few drops of oil and cook covered on a low flame until the top of the dosa is cooked.
Spring Roll Dosa Recipe

3. Layer some of the spring roll filling in a line in the centre of the dosa
Spring Roll Dosa Recipe

4. Gently fold from both sides into a roll.
Spring Roll Dosa Recipe

5. Transfer to a plate and proceed with the rest of the dosas until done
Spring Roll Dosa Recipe

Optional: run a pizza cutter through the dosas diagonally and slice into pieces
Spring Roll Dosa Recipe

Note:
Serve the veg spring roll dosa hot and immediately